
Installing the Dome
On the 13th July 2023 Anne, John, Paul, Richard and my son Lewis joined me in my back garden to erect the observatory. The week before that though, Lewis and I decided to put the dome sections together to save some time on the main build day. I am glad we did this as it was a fairly lengthy day as it was by the end of it.
Of course, the wonderful Scottish summer weather played its usual annoying self. Thankfully it didn’t rain when we were applying the silicone to the section joints, but it came on soon after we finished. The air that night was so humid and damp with intermittent showers, I feared that the silicone would not cure, even with the dome covered by a tarpaulin, thus thinking it would need to be taken apart again and resealed.
By the morning the sealant had started to go hard, and after the Sun had been on it for a few hours it had fully cured. PHEW!
In hindsight, it was good to have done this a week before the main build, as it gave time for the joints to really bond together so not to distort when lifting it onto the base.
On the day of the build I was up nice and early to get all the tools, sealer and bit ready, having pre bagged all the new nuts and bolts which I had purchased a few days earlier. All good to go, so I thought until I couldn’t find the keys for the door, which had been hanging on the key rack in my hall since April. After hunting high and low I could not find them anywhere. Therefore, the day started with me drilling the locking mechanism of the door so we would be able to get inside once the final section was in place.
Footnote: I did find the keys two days later behind some items on the floor, below my key rack!

I was first joined by John and Anne at 10am and soon after by Paul and Richard who arrived together after stopping by Richard’s workshop to pick up some tools. We started by placing the wall sections on the base and marking and drilling the holes into the concrete. Or, we would have done, but at this point Richard realised he had forgot to bring his 240v/120v transformer. He and Paul shot off to fetch it from Lossiemouth. They had a change of plan on route though and decided to got to Elgin where Paul bought this lovely new drill (being modelled by John here) instead. Bought at a very reasonable price too I’ll add.
When they got back they apologised for being so long and said they stopped off for a bacon roll.
Note: they didn’t bring any back for the rest of us mind you.
But no matter my wife Teri kept us supplied with tea, coffee and cakes all throughout the day. You would think putting four wall sections together would be a relatively easy exercise to do wouldn’t you? But having four unstable wall sections all moving independently when trying to position them at equal distances from the pier turned out not to be that simple. So, it was a case of bolting the sections together so we could position the base as one item.
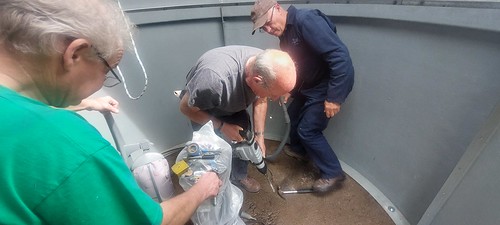
Once the holes were drilled it was time to remove the wall sections again, and to place the anchor rawl plugs into the concrete. This again proved to be not as easy as you would think, partly my fault for misreading the instructions on the packet and not drilling the holes deep enough. Paul really came into his own here with his experience of fitting these type of anchors before. With a little bit of re-drilling and adjustments we got all the anchor bolts to fit.
Of course the Scottish weather played its part again at this point with light shower of rain - which meant that we would not be able to put the sealant onto wet concrete as it would never cure. Thankfully Richard and I had been talking about this a few days before and had come up with a contingency plan. We had two gas heat guns on standby for drying off the concrete before applying the silicon. While Richard and myself were busy heating up the concrete Anne, John and Lewis removed the final bits of old sealant from one of the observatory walls.

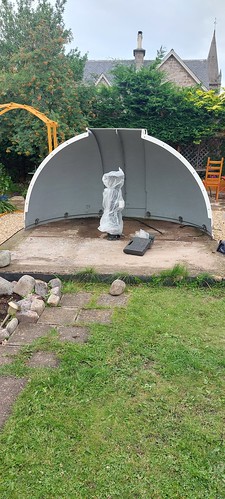
Time had arrived for assembly, once a circular bead of sealant had been placed on the base we positioned the northernmost portion of the wall in place and bolted it to the next one after adding sealant along the joints. It was then at this point I realised I had dramatically underestimated the amount of sealant we were going to need for this job. Thankfully Anne offered to shoot into Elgin to buy a couple more tubes of it, while we got on with the job of erecting the walls. With perfect timing Anne arrived back just when we were ready to place the final section in.

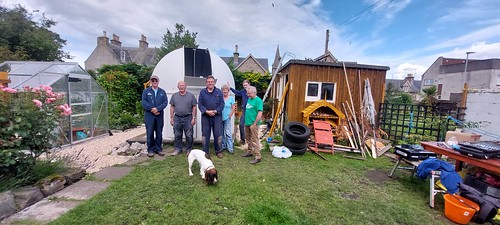
Once we were happy that everything was bolted up tight, time came to lift the dome onto the base. I'm afraid there was no pictures of this as it was all hands on deck to carry out the lift with me inside to position the wheels onto the track. Pleasingly to say this went quite well and the job was complete. Great team effort from everybody, and as you can see we are all very pleased with the results of our days work. Even my dog Bailey seemed impressed.
The Finished Article
Over the last few days I have been tinkering with a few things inside the observatory such as ensuring there's no water ingress, reconnecting the electricity supply and fitting some lights. I was toying with the idea of what lights to fit, previously I had a car fog lamp in there which did the job quite well, but thought that might just look a little bit out of place inside this observatory. I then had a thought about LED lights and found the perfect solution in the B&M store in Elgin. A ten metre length self-adhesive light strip with remote control that allows you to change the brightness of the lights and to change it from white to red. Or for those cloudy nights we can have the lights flashing different colours and we can have a disco inside the observatory instead. Personally, I think these lights look fantastic, and I hope you agree.
Observatory lighting (D.I.S.C.O)
There is still much to do, before the observatory will be ready for use. One of the main things is making an adapter plate for my pier so that the Williams Optics telescope can be fitted to it. But we will get there and it should be ready by the start of the observing season when those lovely long dark nights return again.
Update:
I spent most of Sunday (30th) morning reconfiguring the mount to take the Williams Telescope. Just some tidying up of the wires and flooring to go in and we are ready for the 2023/24 observing season.
Pete Sherman,
Chair
